Since I drink wine so infrequently, I’d be saving corks for years to have enough. I needed about 200 to make the kind of wreath I envisioned. So, I received some from family and won a bulk lot of them from eBay. To find more, try craft shops, online stores such as Widget, and local restaurants.
Before I started, I looked on the Web to see how others had made a wreath. Some, like Alexandra's are quite lovely. Most people used a hot glue gun, toothpicks or straight pins. I didn’t. I used more substantial tools; but, they weren’t difficult to use, and anyone 12 or older could use them.
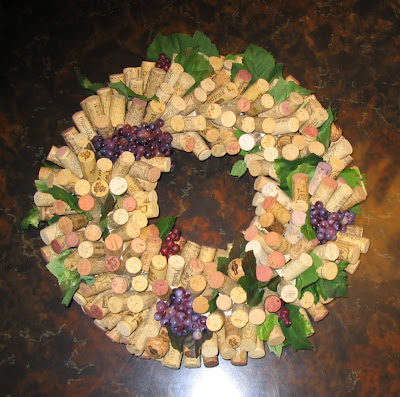
Here’s the finished piece. Instructions follow.
Tools and supplies:
Paper or a vinyl tablecloth to protect work area
one 12-inch straw wreath, keep plastic on it.
a spray or vine of silk grape leaves, preferably with grapes
one or two bunches of small realistic plastic grapes
about 12 floral pins
12 inches of floral wire, medium weight
1 ½ - 2 pounds of 2-inch finish nails
Wire cutters
An awl
Pair of pliers
175-225 used wine corks
- Twist the floral wire around the wreath and twist into a strong loop for hanging, keeping the loop to the back of the wreath. Use the wire cutters to snip any extra wire from the loop or wind it tightly around the base of the loop. (Make sure to test your loop as the final weight of the wreath will surprise you.)
- Using the floral pins to secure the segments, position the grape leaves and grape bunches randomly on the wreath. (I used two bunches of grapes and snipped one in half to make one large bunch and two mini bunches so the wreath would have balance of grapes on either side.)
- Starting with about a dozen corks, use the awl to make a hole into the center-end of each cork, about one inch deep.
- Insert the pointed end of the finish nail into the hole you just made, one nail per cork. Use the pliers, if necessary to help you position the nail more deeply into the cork. About one inch of nail exposing the nail head will stick out from the end of the cork.
- Take the awl and poke a hole into the straw wreath for each place you wish to insert a cork. Insert the nail head fully into the wreath. You’ll get a feel for how closely to arrange them. They should look random and hide the surface of the straw base underneath.
- Repeat the process until you have secured corks throughout the wreath.
- Hang the wreath and enjoy what you have made.
Oh, and send me a photo and a summary of your experience to include with my blog.
No comments:
Post a Comment